Curate, connect, and discover
Art Tutorials - Blog Posts


I have some older art tips that I keep forgetting to post here. I'll add a few in the next few days, at least those that aren't too outdated!
This one is about giving an extra feel of weight to your characters.
I’ve been looking for this post 😭😭 thank u
how to draw arms ? ?
shading colour tips
hey yall its me the Art Mom™ to help you shade pretty
rule 1: DO NOT SHADE WITH BLACK. EVER. IT NEVER LOOKS GOOD.
red- shade with a slightly darker shade of purple
orange- slightly darker and more saturated shade of red
yellow- i think like..a peach could work but make it a really light peach
green- shade with darker and less saturated shade of blue or teal
blue- shade with purple
purple- a shade thats darker than the purple you’re using and maybe a little pink (MAYBE blue)
pink- darker shade of red
white- a really light lavender or blue..or i guess any really light colour??
black- okay listen dont use pure black to colour anything unless you want to leave it with flat colours because you cant really shade black lol
grey- a slightly darker shade of purple or blue (less saturated)
brown- slightly darker and less saturated shade of purple or red
aaaaand thats all i got lol. let me know if there is anything i should add to this list!!
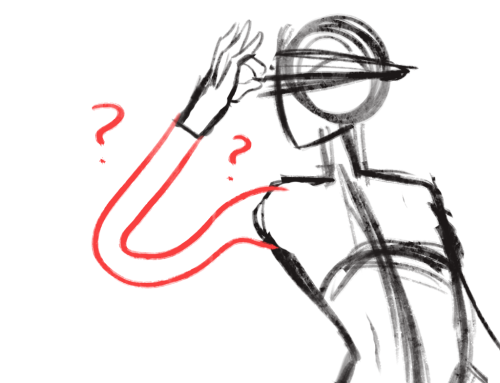
spec. spec. spec youve changed the game. i never realized your pointer finger and your wrist artery are the same. holy shit. im going to draw hands thank you


aasdjsd its not really an artery but its a useful landmark to facilitate the Flow of a pose imo
for all the artists out there, here are my favorite resources i use to learn!
Files
The Complete Famous Artist Course
Art Books and Resources
Art, Anatomy, and Color Books
PDF Files of Art Books
Internet Archive
YouTube
My YouTube Playlist of Tutorials
How to Draw Facial Features
Drawing and Art Advice
Drawing Lessons
Art Fundamentals
Anatomy of the Human Body
2D Animation
Perspective Drawing
Websites
Pinterest Board for Poses
Another Pinterest Board for Poses
Pinterest Boards for References
Reference Angle
AdorkaStock
Figurosity
Line of Action
Human Anatomy
Animal Photo References
Humanae - Angélica Dass
Fine Art - Jimmy Nelson
Character Design References
CDR's Twitter Account
iamagco's Twitter Account
taco1704's Twitter Account
takuya_kakikata's Twitter Account
EtheringtonBro's Twitter Account
Drawabox
Color Wheel
Color Palette Cinema
Free Images and Pictures
Free Stock Photos
FILMGRAB
Screen Musings
William Nguyen Light Reference Tool
SketchFab - 3D Skeleton Model
Animation References - sakugabooru
Animation Screen Caps
Animation References - Bodies in Motion
maybe i missed this in ur advice tag, but i adore how you draw and render hands! how do you simplify them? any tips for a novice?
Thank you! I'm really just following the most basic of "how-to-draw-hands" rulebooks and then making them sharp and sinewy as all hell. The only thing I think I do differently from most tutorials I've seen is including the wrist joint in the structure of the hand when I sketch it.


Disclaimer: I draw hands kinda messed up. I enjoy them that way. Your art teacher may not, LOL.


Overview of some topics when it comes to drawing characters who are burn survivors.
DISCLAIMER. Please keep in mind that this is an introductory overview for drawing some burn scars and has a lot of generalizations in it, so not every “X is Z” statement will be true for Actual People. I'm calling this introductory because I hope to get people to actually do their own research before drawing disabled & visibly different characters rather than just making stuff up. Think of it as a starting point and take it with a grain of salt (especially if you have a very different art style from mine).
Talking about research and learning... don't make your burn survivor characters evil. Burn survivors are normal people and don't deserve to be constantly portrayed in such a way.

edit: apparently tum "queerest place on the internet" blr hates disabled people so much that this post got automatically filtered. cool!
Do you have any art tips? Mostly for anatomy
VERY REALLY FAST rundown of some niche tips I have discovered, specifically for the body types I tend to draw (muscular-soft)
For torso: ribcage/lats area in purple, abdomen/belly comes in blue.


centre line to divide the chest and show the middle of the stomach. frowny face is the top of the abs (kisses the bottom of the pecs) and the nips. Pecs are trapezoidal and connect to the shoulders at a diagonal. The shape of the chest gets more rounded with more body fat generally


Then the traps are like a triangle, the bottom of the triangle is the general area of the collarbone, and the neck starts about halfway up the triangle (this is a super general guide ofc, lots of people aren't built like that... and this isn't perfect anatomy!! but it's a shorthand I use for sketching.)


From the side, the torso has a couple major Bumps:

And when drawing a leg, I tend to draw "hip dips" (really what a stupid name) and the two big boy muscles. I dont draw feet/ankles because I despise them. I'm also terrible at butts.


ARMS!!!!! I do delts/shoulders, bicep, tricep, and idk forearm muscles im not an expert


triceps tend to be engaged when the arm is extended straight (leaning on a surface, downward pull, etc), biceps tend to be engaged when bending at the elbow. Going to the gym helps make this make a lot of sense. Or just exercise in general. Idk)


ELBOWS... I think of elbow like the hard spot that hinges between two meaty bits... This one I don't know how else to explain. I woke up one day and god granted me the power to make elbows look ok
Anyway ya I am not an expert but hopefully some of this is helpful. Biggest most boring advice is: practice with reference photos. Learn about the major muscles and how they fit together, including on your own body if you can see them relaxed VS engaged. Practice practice practice until you can memorize the shapes. Practice!!!!!! And that's it
This is a good site for lots of poses but I also use good ol pinterest or take pics of myself if need be. That's a classic.

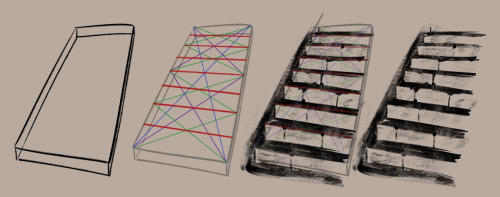
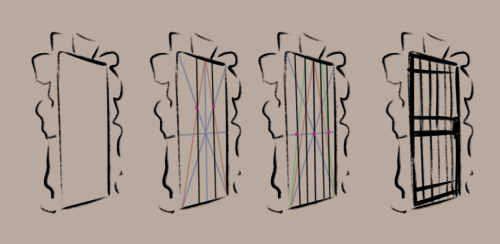
really helpful technique ^ once you know how to divide by halves and thirds it makes drawing evenly spaced things in perspective waaay easier:


Gave myself a little homework! It's always a challenge to keep up with good study habits when you're already balancing work and life. While this is hardly a tutorial (nowhere near enough to comprehensive I think to qualify as one), I realized as I was sketching from reference that it might be beneficial for others if I wrote down my thoughts on how I approach drawing hands.
See these studies and notes for free up on my Patreon! I want to share more of my studies, available for the free membership. Subscribe for first access to my other sketchbook entries, WIP illustrations, and process posts.


got an ask recently about the way my digital art looks like traditional, so I tried to explain the steps on my self portrait, feat. some of my favorite artists and favorite brushes. sorry if it's incoherent, I'm not used to explaining my process besides "I've been professionally studying traditional art for half my life and I'm really bad at technology so I just paint digitally the way I do on paper"
being a self-taught artist with no formal training is having done art seriously since you were a young teenager and only finding out that you’re supposed to do warm up sketches every time you’re about to work on serious art when you’re fuckin twenty-five


Compiled some basic information I know about drawing fat characters for beginners since I've been seeing more talk about absence of really basic traits in a lot of art lately.
Morpho Fat and Skin Folds on Archive.org (for free!)
⭐ So you want to learn pixel art? ⭐
🔹 Part 1 of ??? - The Basics!
Hello, my name is Tofu and I'm a professional pixel artist. I have been supporting myself with freelance pixel art since 2020, when I was let go from my job during the pandemic.


My progress, from 2017 to 2024. IMO the only thing that really matters is time and effort, not some kind of natural talent for art.
This guide will not be comprehensive, as nobody should be expected to read allat. Instead I will lean heavily on my own experience, and share what worked for me, so take everything with a grain of salt. This is a guide, not a tutorial. Cheers!
🔹 Do I need money?
NO!!! Pixel art is one of the most accessible mediums out there.
I still use a mouse because I prefer it to a tablet! You won't be at any disadvantage here if you can't afford the best hardware or software.
Because our canvases are typically very small, you don't need a good PC to run a good brush engine or anything like that.
✨Did you know? One of the most skilled and beloved pixel artists uses MS PAINT! Wow!!
🔹 What software should I use?
Here are some of the most popular programs I see my friends and peers using. Stars show how much I recommend the software for beginners! ⭐
💰 Paid options:
⭐⭐⭐ Aseprite (for PC) - $19.99
This is what I and many other pixel artists use. You may find when applying to jobs that they require some knowledge of Aseprite. Since it has become so popular, companies like that you can swap raw files between artists.
Aseprite is amazingly customizable, with custom skins, scripts and extensions on Itch.io, both free and paid.
If you have ever used any art software before, it has most of the same features and should feel fairly familiar to use. It features a robust animation suite and a tilemap feature, which have saved me thousands of hours of labour in my work. The software is also being updated all the time, and the developers listen to the users. I really recommend Aseprite!
⭐ Photoshop (for PC) - Monthly $$
A decent option for those who already are used to the PS interface. Requires some setup to get it ready for pixel-perfect art, but there are plenty of tutorials for doing so.
Animation is also much more tedious on PS which you may want to consider before investing time!
⭐⭐ ProMotion NG (for PC) - $19.00
An advanced and powerful software which has many features Aseprite does not, including Colour Cycling and animated tiles.
⭐⭐⭐ Pixquare (for iOS) - $7.99 - $19.99
Probably the best app available for iPad users, in active development, with new features added all the time.

Look! My buddy Jon recommends it highly, and uses it often.
One cool thing about Pixquare is that it takes Aseprite raw files! Many of my friends use it to work on the same project, both in their office and on the go.
⭐ Procreate (for iOS) - $12.99
If you have access to Procreate already, it's a decent option to get used to doing pixel art. It does however require some setup. Artist Pixebo is famously using Procreate, and they have tutorials of their own if you want to learn.
🆓 Free options:
⭐⭐⭐ Libresprite (for PC)
Libresprite is an alternative to Aseprite. It is very, very similar, to the point where documentation for Aseprite will be helpful to Libresprite users.
⭐⭐ Pixilart (for PC and mobile)
A free in-browser app, and also a mobile app! It is tied to the website Pixilart, where artists upload and share their work. A good option for those also looking to get involved in a community.
⭐⭐ Dotpict (for mobile)
Dotpict is similar to Pixilart, with a mobile app tied to a website, but it's a Japanese service. Did you know that in Japanese, pixel art is called 'Dot Art'? Dotpict can be a great way to connect with a different community of pixel artists! They also have prompts and challenges often.
🔹 So I got my software, now what?
◽Nice! Now it's time for the basics of pixel art.
❗ WAIT ❗ Before this section, I want to add a little disclaimer. All of these rules/guidelines can be broken at will, and some 'no-nos' can look amazing when done intentionally.
The pixel-art fundamentals can be exceedingly helpful to new artists, who may feel lost or overwhelmed by choice. But if you feel they restrict you too harshly, don't force yourself! At the end of the day it's your art, and you shouldn't try to contort yourself into what people think a pixel artist 'should be'. What matters is your own artistic expression. 💕👍
◽Phew! With that out of the way...
🔸"The Rules"
There are few hard 'rules' of pixel art, mostly about scaling and exporting. Some of these things will frequently trip up newbies if they aren't aware, and are easy to overlook.
🔹Scaling method
There are a couple ways of scaling your art. The default in most art programs, and the entire internet, is Bi-linear scaling, which usually works out fine for most purposes. But as pixel artists, we need a different method.


Both are scaled up x10. See the difference?
On the left is scaled using Bilinear, and on the right is using Nearest-Neighbor. We love seeing those pixels stay crisp and clean, so we use nearest-neighbor.
(Most pixel-art programs have nearest-neighbor enabled by default! So this may not apply to you, but it's important to know.)
🔹Mixels
Mixels are when there are different (mixed) pixel sizes in the same image.

Here I have scaled up my art- the left is 200%, and the right is 150%. Yuck!
As we can see, the "pixel" sizes end up different. We generally try to scale our work by multiples of 100 - 200%, 300% etc. rather than 150%. At larger scales however, the minute differences in pixel sizes are hardly noticeable!
Mixels are also sometimes seen when an artist scales up their work, then continues drawing on it with a 1 pixel brush.

Many would say that this is not great looking! This type of pixels can be indicative of a beginner artist. But there are plenty of creative pixel artists out there who mixels intentionally, making something modern and cool.
🔹Saving Your Files
We usually save our still images as .PNGs as they don’t create any JPEG artifacts or loss of quality. It's a little hard to see here, but there are some artifacts, and it looks a little blurry. It also makes the art very hard to work with if we are importing a JPEG.

For animations .GIF is good, but be careful of the 256 colour limit. Try to avoid using too many blending mode layers or gradients when working with animations. If you aren’t careful, your animation could flash afterwards, as the .GIF tries to reduce colours wherever it can. It doesn’t look great!

Here's an old piece from 2021 where I experienced .GIF lossiness, because I used gradients and transparency, resulting in way too many colours.
🔹Pixel Art Fundamentals - Techniques and Jargon
❗❗Confused about Jaggies? Anti-Aliasing? Banding? Dithering? THIS THREAD is for you❗❗
As far as I'm concerned, this is THE tutorial of all time for understanding pixel art. These are techniques created and named by the community of people who actually put the list together, some of the best pixel artists alive currently. Please read it!!
🔸How To Learn
Okay, so you have your software, and you're all ready to start. But maybe you need some more guidance? Try these tutorials and resources! It can be helpful to work along with a tutorial until you build your confidence up.
⭐⭐ Pixel Logic (A Digital Book) - $10 A very comprehensive visual guide book by a very skilled and established artist in the industry. I own a copy myself.
⭐⭐⭐ StudioMiniBoss - free A collection of visual tutorials, by the artist that worked on Celeste! When starting out, if I got stuck, I would go and scour his tutorials and see how he did it.
⭐ Lospec Tutorials - free A very large collection of various tutorials from all over the internet. There is a lot to sift through here if you have the time.
⭐⭐⭐ Cyangmou's Tutorials - free (tipping optional) Cyangmou is one of the most respected and accomplished modern pixel artists, and he has amassed a HUGE collection of free and incredibly well-educated visual tutorials. He also hosts an educational stream every week on Twitch called 'pixelart for beginners'.
⭐⭐⭐ Youtube Tutorials - free There are hundreds, if not thousands of tutorials on YouTube, but it can be tricky to find the good ones. My personal recommendations are MortMort, Brandon, and AdamCYounis- these guys really know what they're talking about!
🔸 How to choose a canvas size
When looking at pixel art turorials, we may see people suggest things like 16x16, 32x32 and 64x64. These are standard sizes for pixel art games with tiles. However, if you're just making a drawing, you don't necessarily need to use a standard canvas size like that.
What I like to think about when choosing a canvas size for my illustrations is 'what features do I think it is important to represent?' And make my canvas as small as possible, while still leaving room for my most important elements.
Imagine I have characters in a scene like this:

I made my canvas as small as possible (232 x 314), but just big enough to represent the features and have them be recognizable (it's Good Omens fanart 😤)!! If I had made it any bigger, I would be working on it for ever, due to how much more foliage I would have to render.
If you want to do an illustration and you're not sure, just start at somewhere around 100x100 - 200x200 and go from there.
It's perfectly okay to crop your canvas, or scale it up, or crunch your art down at any point if you think you need a different size. I do it all the time! It only takes a bit of cleanup to get you back to where you were.
🔸Where To Post
Outside of just regular socials, Twitter, Tumblr, Deviantart, Instagram etc, there are a few places that lean more towards pixel art that you might not have heard of.
⭐ Lospec Lospec is a low-res focused art website. Some pieces get given a 'monthly masterpiece' award. Not incredibly active, but I believe there are more features being added often.
⭐⭐ Pixilart Pixilart is a very popular pixel art community, with an app tied to it. The community tends to lean on the young side, so this is a low-pressure place to post with an relaxed vibe.
⭐⭐ Pixeljoint Pixeljoint is one of the big, old-school pixel art websites. You can only upload your art unscaled (1x) because there is a built-in zoom viewer. It has a bit of a reputation for being elitist (back in the 00s it was), but in my experience it's not like that any more. This is a fine place for a pixel artist to post if they are really interested in learning, and the history. The Hall of Fame has some of the most famous / impressive pixel art pieces that paved the way for the work we are doing today.
⭐⭐⭐ Cafe Dot Cafe Dot is my art server so I'm a little biased here. 🍵 It was created during the recent social media turbulence. We wanted a place to post art with no algorithms, and no NFT or AI chuds. We have a heavy no-self-promotion rule, and are more interested in community than skill or exclusivity. The other thing is that we have some kind of verification system- you must apply to be a Creator before you can post in the Art feed, or use voice. This helps combat the people who just want to self-promo and dip, or cause trouble, as well as weed out AI/NFT people. Until then, you are still welcome to post in any of the threads or channels. There is a lot to do in Cafe Dot. I host events weekly, so check the threads!
⭐⭐/r/pixelart The pixel art subreddit is pretty active! I've also heard some of my friends found work through posting here, so it's worth a try if you're looking. However, it is still Reddit- so if you're sensitive to rude people, or criticism you didn't ask for, you may want to avoid this one. Lol
🔸 Where To Find Work
You need money? I got you! As someone who mostly gets scouted on social media, I can share a few tips with you:
Put your email / portfolio in your bio Recruiters don't have all that much time to find artists, make it as easy as possible for someone to find your important information!
Clean up your profile If your profile feed is all full of memes, most people will just tab out rather than sift through. Doesn't apply as much to Tumblr if you have an art tag people can look at.
Post regularly, and repost Activity beats everything in the social media game. It's like rolling the dice, and the more you post the more chances you have. You have to have no shame, it's all business baby
Outside of just posting regularly and hoping people reach out to you, it can be hard to know where to look. Here are a few places you can sign up to and post around on.
/r/INAT INAT (I Need A Team) is a subreddit for finding a team to work with. You can post your portfolio here, or browse for people who need artists.
/r/GameDevClassifieds Same as above, but specifically for game-related projects.
Remote Game Jobs / Work With Indies Like Indeed but for game jobs. Browse them often, or get email notifications.
VGen VGen is a website specifically for commissions. You need a code from another verified artist before you can upgrade your account and sell, so ask around on social media or ask your friends. Once your account is upgraded, you can make a 'menu' of services people can purchase, and they send you an offer which you are able to accept, decline, or counter.
The evil websites of doom: Fiverr and Upwork I don't recommend them!! They take a big cut of your profit, and the sites are teeming with NFT and AI people hoping to make a quick buck. The site is also extremely oversaturated and competitive, resulting in a race to the bottom (the cheapest, the fastest, doing the most for the least). Imagine the kind of clients who go to these websites, looking for the cheapest option. But if you're really desperate...
🔸 Community
I do really recommend getting involved in a community. Finding like-minded friends can help you stay motivated to keep drawing. One day, those friends you met when you were just starting out may become your peers in the industry. Making friends is a game changer!
Discord servers Nowadays, the forums of old are mostly abandoned, and people split off into many different servers. Cafe Dot, Pixel Art Discord (PAD), and if you can stomach scrolling past all the AI slop, you can browse Discord servers here.
Twitch Streams Twitch has kind of a bad reputation for being home to some of the more edgy gamers online, but the pixel art community is extremely welcoming and inclusive. Some of the people I met on Twitch are my friends to this day, and we've even worked together on different projects! Browse pixel art streams here, or follow some I recommend: NickWoz, JDZombi, CupOhJoe, GrayLure, LumpyTouch, FrankiePixelShow, MortMort, Sodor, NateyCakes, NyuraKim, ShinySeabass, I could go on for ever really... There are a lot of good eggs on Pixel Art Twitch.
🔸 Other Helpful Websites
Palettes Lospec has a huge collection of user-made palettes, for any artist who has trouble choosing their colours, or just wants to try something fun. Rejected Palettes is full of palettes that didn't quite make it onto Lospec, ran by people who believe there are no bad colours.
The Spriters Resource TSR is an incredible website where users can upload spritesheets and tilesets from games. You can browse for your favourite childhood game, and see how they made it! This website has helped me so much in understanding how game assets come together in a scene.
VGMaps Similar to the above, except there are entire maps laid out how they would be played. This is incredible if you have to do level design, or for mocking up a scene for fun.
Game UI Database Not pixel-art specific, but UI is a very challenging part of graphics, so this site can be a game-changer for finding good references!
Retronator A digital newspaper for pixel-art lovers! New game releases, tutorials, and artworks!
Itch.io A website where people can upload, games, assets, tools... An amazing hub for game devs and game fans alike. A few of my favourite tools: Tiled, PICO-8, Pixel Composer, Juice FX, Magic Pencil for Aseprite
🔸 The End?
This is just part 1 for now, so please drop me a follow to see any more guides I release in the future. I plan on doing some writeups on how I choose colours, how to practise, and more!
I'm not an expert by any means, but everything I did to get to where I am is outlined in this guide. Pixel art is my passion, my job and my hobby! I want pixel art to be recognized everywhere as an art-form, a medium of its own outside of game-art or computer graphics!
This guide took me a long time, and took a lot of research and experience. Consider following me or supporting me if you are feeling generous.
And good luck to all the fledgling pixel artists, I hope you'll continue and have fun. I hope my guide helped you, and don't hesitate to send me an ask if you have any questions! 💕


Very happy to finally post my third tutorial! Thank you so much for your overwhelming support of my last tutorial, I am so happy it was useful for you guys 🙇♀️. I feel like this topic was harder to explain so feel free to ask me some questions if you want!
Like last time, I really hope this helps some of you in your art path 🙌

Do you have any advice on how to get over lack of skill? I want to do the Astarion Lestate trend but I don't think my skills are ready for it. I have references pictures of Astarion pulled up when I'm working, and even have the game launched so I can turn him if I need to (mostly for the attempts I did at his hair) but everytime I tweaked something or started over nothing looked right. I keep getting frustrated 😭
Hi anon- Sorry this took me a while to get to, i hope you and others can still find this useful! While the basic advise to get over 'lack of skill' is PRACTICE, PRACTICE, PRACTICE! i hope this will help you knowig where to get started with that!
I'm going to put my teacher pants back on, this might be a bit long so buckle up- I'll go over a few areas:
Primitive Shapes
How to Use References
Delete your work (hear me out)
--------------------------------------
Primitive Shapes:
This is your foundation. Everything starts with this, and while you may find it boring to think of your art in terms of cubes and spheres- i kid you not it will help elevate your work.
If/when you are stuggling to draw a complicated pose, or a specific perspective, refering back to the form in these basic shapes can really help to simplify your process and help you problem solve.
A chill/silly watch for a more in depth discussion on what i mean / how this can help - Give Pikat's 'Draw boxes (correctly) to improve your art' a watch. They also mention this in the video but @/Uncomfortable on youtube also has some great fundermental videos.
-------------------------------------
How to use references.
Okay so references are great 10/10 very useful. But, unless you know WHAT to study from a reference, they can sometimes fall flat of their usefullness.
Anatomy studies are something a lot of us will be recommended as artists, but actually knowing what to pay attention to can boost your confidence in your work. Start with a goal, what do you want to get out of this sketch session? Do you want to get better at understanding the 3D form of a specific part of anatomy? Better at poses? Try to narrow down your learning each session to make it less overwhelming.
In this i'll focus on understanding the form so, lets start with a reference. Linking back to Primitives again, start off by braking down your anatomy into forms. Sketching over the top of your references is totally fine. But make sure you are doing so critically, otherwise it may look like a flat/unnatural trace and you're not really learning from it. Via the first sketch you can see where the primitive shapes fall on the body - think of it like a ball-jointed-doll, hips, knees, shoulders ect are ball socketed whereas arms, legs ect can be made up of tubes. (See the first image, when sketching your tubes, sketch your contour lines too- this can help determind how clothing / hair will fall over the body, and can help you understand the 3D Form.)

A BIG IMPORTANT SIDE NOTE - When using photo references, do be very aware that they may be distorted due to the height of the camera, or camera focal length - (you can see in my sketch i had to edit the torso and head because the reference was a little top heavy)
A few artists/books for some extra reading / reference : - Andrew Loomis (OG for body proportions, books are a little outdated but fundermentals are still useful), - Tenten云画画 (his stylised anatomy breakdowns are very interesting to me) - Anatomy Essentials (I've had this book for years, it covers lots of areas, is a bit complex though, i myself should reread it again 😅
Also, if you can't find a reference for a specific pose, don't be afraid to use 3D programs! Anatomy 360, DesignDoll, Clip Studio, Magic Poser - all nifty options~
SO taking when we've learnt from the primitive forms, you can now try applying that to the Lestrat Picture. (which, granted is a complicated pose, as it also has forshortening and an odd top down perspetive of the bottom character- so don't panic if you don't get it the first time!)
-------------------------------------
Final points- Delete your art (hear me out)
What i mean by this is, sometimes reworking the same face over and over again can bog your down. It can make it very difficult to actually see whats wrong. So, get rid of it and start again. (hide the layer/use a different piece of paper, please don't actually bin it (yet))
Next, redraw it. Use what you've learned the first time, and redraw it from scratch. (in this case, that might be just specifically the head, or the hair, or the eyes ect - you don't have to bin the whole thing, but sometimes it can really help give you a new perspective)
Once you've done this, unhide your original, compare, this may help you understand what you were doing wrong the first time. Or if there are areas of one that you like- its an opportunity to combine them as you see fit! :)
On a side note for Astarion's Hair, the lovely @mistercrowbar actually posted a breakdown yesterday! (i use p much the same method so-)
I HOPE this was of some use- do feel free to ask any questions if you've got them! i'll try to answer in a more timely manner next time 😅
hey, long time admirer of your stuff! ive just been wondering, though, how exactly do you do your eyes? like.. obviously they're different from character to character, but how do you usually form them and whatnot?
thank you ! - 💥
heya thank you :) it's been a while since i answered one of these in depth but for you good anon i will try my best..... Here's the simple answer:

Here is some more thought-process/behind the scenes stuff:

Obviously head angle determines many things about drawing eyes; I've been trying harder to keep it in mind when I'm putting lines down, and it'll generally make them look more grounded/offer better depth. The main takeaway from head angle is how are the eye sockets oriented. Doing drawovers of photographs is a cheap+easy way to get a feel for this, but I wouldn't worry about 100% anatomical accuracy; what I'm trying to get a feel for is the placement of eyes versus the brow/nose bridges.


The amount of detail I put into eyes is wildly inconsistent haha it rly depends on the piece and art style, but the (for lack of a better word) "definition lines" and spots of black in deep shadow make up most of the detailed stuff. I'm still not great at drawing massively distinctive eye shapes but I try to maintain a general sense of one for different faces (ex. Rectangular, narrow, round, angled up or down). I'll also be the first to admit it takes a lot of conscious thought to reproduce the same line variation/angles in someone's eyes each time you draw them, but if you're looking for advice on consistency those are examples of traits I'd keep in mind.

That's it for the most part.... I don't think the way I draw eyes is particularly unique lol so here are a few things that have gotten me where I am:
other people's art, a lot of which is manga. when I say naruto taught me to draw im only half joking hwheeze. my art tastes lean towards manga/comic stylization so none of this is hugely realistic overall....
that being said, I do like the more realistic side of manga/comic art so photo studies/anatomy tips have still been useful to me
this tutorial by sinix is one of my favorite things ever, because it explicitly discusses both anatomical knowledge AND how to translate that into shorthand
thanks for the ask!